Maytag Neptune is a popular brand of washing machines known for its durability and efficiency. However, like all machines, over time, the parts of the machine wear out and need to be replaced.
One such part is the control board, which is responsible for controlling various functions of the washer. In this article, we will discuss the Maytag Neptune washer control board replacement guide.
Table of Contents
- Introduction
- Symptoms of a faulty control board
- Safety precautions
- Tools required for replacement
- Steps for replacing the control board
- Testing the new control board
- Common mistakes to avoid during replacement
- Conclusion
- FAQs
Introduction
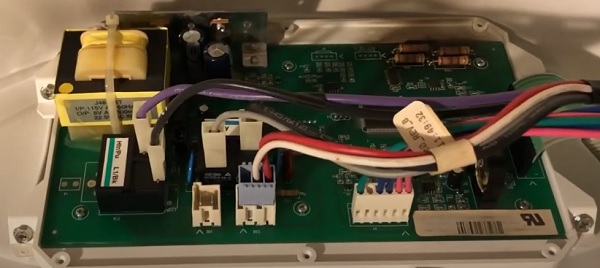
The control board is the brain of the Maytag Neptune washing machine, responsible for controlling the machine’s functions. A faulty control board can cause the washer to malfunction or stop working entirely.
In this guide, we will walk you through the steps to replace the control board in your Maytag Neptune washer.
Symptoms of a faulty control board
A faulty control board can cause various problems with your washing machine. Some of the most common symptoms include:
- The washer won’t turn on.
- The washer stops mid-cycle.
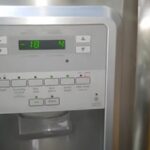
- The washer displays error codes.
- The washer doesn’t spin or agitate.
- The washer overfills or underfills with water.
If you’re experiencing any of these symptoms, it may be time to replace the control board.
Safety precautions
Before starting the replacement process, it’s essential to take some safety precautions to avoid injury or damage to the machine. Some of the precautions to take include:
- Unplug the machine from the power source.
- Turn off the water supply to the machine.
- Wear safety gloves and goggles to protect your hands and eyes.
- Keep the work area clean and dry.
Tools required for replacement
To replace the control board in your Maytag Neptune washer, you will need the following tools:
- Screwdriver (Phillips and flathead)
- Pliers
- Nut driver
- Wire cutters
- Electrical tape
Make sure you have all these tools before starting the replacement process.
Steps for replacing the control board
Follow these steps to replace the control board in your Maytag Neptune washer:
- Unplug the machine from the power source and turn off the water supply.
- Remove the screws that hold the control panel in place using a screwdriver.
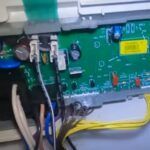
- Lift the control panel and disconnect the wires from the old control board using pliers.
- Remove the screws that hold the old control board in place using a nut driver.
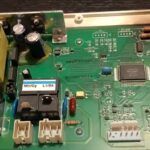
- Take out the old control board and install the new control board in its place.
- Secure the new control board in place with screws using a nut driver.
- Reconnect the wires to the new control board using pliers.
- Replace the control panel and secure it in place with screws using a screwdriver.
- Turn on the water supply and plug the machine back into the power source.
Testing the new control board
After replacing the control board, it’s essential to test the machine to ensure it’s working correctly. Follow these steps to test the new control board:
- Turn on the machine and select a cycle.
- Let the machine run for a few minutes to ensure it’s working correctly.
- Check for any error codes or other issues.
If the machine is working correctly and there are no error codes, then the new control board has been successfully installed.
Common mistakes to avoid during replacement
Replacing the control board can be a complex process, and mistakes can happen. Some of the most common mistakes to avoid include:
- Forgetting to unplug the machine from the power source
- Not turning off the water supply to the machine
- Not wearing safety gloves and goggles
- Not keeping the work area clean and dry
- Disconnecting the wrong wires from the old control board
- Installing the new control board incorrectly
- Forgetting to test the machine after replacement
Make sure to avoid these mistakes to ensure a successful control board replacement.
Conclusion
Replacing the control board in your Maytag Neptune washer can be a complex process, but with the right tools and steps, it can be done successfully. By following the guide outlined above, you can replace the control board and have your washer running smoothly again in no time.
LEARN MORE >> Maytag Washer Repair Help at Repair Clinic
FAQs
- Can I replace the control board myself, or should I hire a professional? It’s possible to replace the control board yourself if you have the right tools and knowledge. However, if you’re unsure or uncomfortable with the process, it’s best to hire a professional.
- How long does it take to replace the control board? The process of replacing the control board can take anywhere from 1-2 hours, depending on your level of experience and the complexity of the machine.
- Where can I buy a replacement control board for my Maytag Neptune washer? You can buy a replacement control board from various appliance parts stores or online retailers.
- How much does it cost to replace the control board? The cost of a replacement control board can vary depending on the model of your Maytag Neptune washer and where you purchase the part. It’s best to do some research and compare prices before making a purchase.
- What other parts should I check if my Maytag Neptune washer is still not working after replacing the control board? If your washer is still not working correctly after replacing the control board, it’s possible that other parts of the machine may be faulty. You should check the motor, belt, and pump for any issues. If you’re unsure, it’s best to consult a professional.
Maytag Appliance Control Board Parts and Repair Guides
- Quick Fixes for Maytag Refrigerator Control Panel Not Working
- How to Fix a Maytag Dishwasher Panel Not Working
- Maytag Washer Control Board Replacement

- Common Problems with Maytag Neptune Dryer Control Boards
Other Control Board Repair Services:
- Common Problems with Maytag Neptune Washer Control Boards
- Troubleshooting Maytag Neptune Washer Control Board Issues
- Frigidaire Oven Buttons Not Working? Troubleshoot Your Control Board
1 thought on “Maytag Neptune Washer Control Board Replacement Guide”